Wednesday, December 14, 2016
Professional Article Review - Animation
In the article "Yes, as a Matter of Fact. You Do Need to Learn 3D.", on lynda.com by Starshine Roshell, the article gives several reasons why you should learn 3D animation. The author tells the reader what our culture wants to see, what 3D animation is used in, and how to train yourself to see in a 3D perspective. The article tries to convince readers that 3D animation is useful, and that they need to take the lynda.com tutorials. While the article is more of an advertisement, it is in article format and does present some points as to why 3D animation is important.

Monday, December 5, 2016
Feature Story 2
In my video production class, we had to make two feature stories. This one was about my friend TJ Dahl. The story was about his volunteer work at our church. He talked about the numerous tasks that he does around the church, and there are scenes of him working.
The narrative lead is an important part of any feature story, and I actually recorded mine after I made the video. This helped me to know how I wanted to begin the story, and what I needed to say to make that happen.
First, I interviewed TJ himself to talk to him about everything that he did on Sunday mornings. He gave details about what he did, who he worked with, when he started, and when he went. After that, I interviewed TJ's mother Danna. She talked about how she also volunteered at the church, but rather than doing odd jobs, she works with the high school students.
Shooting the video was pretty simple. Occasionally, the lighting wouldn't work well, or the focus on the camera was off, but other than that it was easy. Setting up the camera, adjusting the zoom, and clicking a button. It's pretty easy. Editing was just putting the clips into a sequence that I liked.
The feedback from my classmates was mostly suggestions, and I listened carefully. I ended up changing the entire sequence of my video based on one little suggestion. It just goes to show you, every little detail counts.
Friday, November 18, 2016
What makes a good feature story?
When you watch a feature story on the news, it can be captivating. An inspiring story about a blind man who kayaked an entire river, a long-lost child returning home, some stories just give you a warm and fuzzy feeling. But why do the stories do this? What makes you want to cry, laugh, or cheer? What makes a good feature story?
The first thing that you need when creating a successful feature story is a good topic. Obviously, the topic must be something interesting, otherwise no one will care. For example, a blind man kayaking the entire length of the colorado river is a great story that would inspire people. No one would want to hear a story about a little kid who dropped his ice cream.
Making sure you get good footage is one of the most important things when making a feature story. Footage of the activity or topic that you are talking about is imperative. When the footage relates to what you're talking about, the viewers are more interested.
As with any film, you want to have good lighting and sound. There needs to be enough light that you can see, but not so much that the glare blinds the camera. On the same note, a little bit of natural noise is welcome, but too much overpowers your voice-overs and leaves your viewers confused.
An effective voice-over is another important part of creating a feature story. A voice-over can introduce a topic, transfer a viewer's attention to a new part of the topic, and end the feature story on a high note. Voice-overs keep your viewers interested, and they can be used to articulate an unclear part of the story. Also, they are often used to explain what the person in the story may be talking about, as putting the creator of the feature story is considered unprofessional.
These are good things to do when creating a good feature story. Remember, if the video is too long, the viewers may lose interest. Try to keep it as brief and concise as possible.
The first thing that you need when creating a successful feature story is a good topic. Obviously, the topic must be something interesting, otherwise no one will care. For example, a blind man kayaking the entire length of the colorado river is a great story that would inspire people. No one would want to hear a story about a little kid who dropped his ice cream.
Making sure you get good footage is one of the most important things when making a feature story. Footage of the activity or topic that you are talking about is imperative. When the footage relates to what you're talking about, the viewers are more interested.
As with any film, you want to have good lighting and sound. There needs to be enough light that you can see, but not so much that the glare blinds the camera. On the same note, a little bit of natural noise is welcome, but too much overpowers your voice-overs and leaves your viewers confused.
An effective voice-over is another important part of creating a feature story. A voice-over can introduce a topic, transfer a viewer's attention to a new part of the topic, and end the feature story on a high note. Voice-overs keep your viewers interested, and they can be used to articulate an unclear part of the story. Also, they are often used to explain what the person in the story may be talking about, as putting the creator of the feature story is considered unprofessional.
These are good things to do when creating a good feature story. Remember, if the video is too long, the viewers may lose interest. Try to keep it as brief and concise as possible.
Friday, November 11, 2016
Story Animation
The latest 2D animation from my animation class required a story. There needed to be a plot, action, and a walk cycle. After creating storyboards for our animations, my class began to work. The creation process began in Adobe Photoshop. Characters, backgrounds, everything was crafted and colored to fit each person's needs. Each layer was perfected, then the work was moved to Adobe After Effects.
Adobe After Effects was the program used to put the animation together. Each layer was placed in its position, then moved throughout the animation. Some things could be moved with the use of key frames, while some objects needed to be moved with puppet pin tools. I included a stick figure in my animation, and I used puppet pin tools to move it. My robot's legs were moved with the use of key frames. I set the legs in a position, then created a key frame to make the legs be in that position at the selected time. After a full cycle, I copied and pasted the key frames to make the walk look consistent.

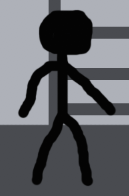

The final animation wasn't the best. The concept was supposed to be that the robot was a ghost, or a hologram, or something. But nobody seemed to get that. They just figured I did a bad job. And while it wasn't as obvious as it could've been, I'm still learning this, I don't know how I could make it any clearer, and they probably should've been able to figure it out. Some of my classmates started pointing out stuff that was wrong with it, but I did those things on purpose to try and make it look like the robot was a ghost. Yes, there were things that I could have done better, but overall, most of the criticism was based around a false assumption. And at least something happened in my animations. There were some animations where the entire scene was a badly drawn blob walking for 30 seconds. If I had more time, I would have concentrated on the details a little bit more rather than just focusing on finishing.
Adobe After Effects was the program used to put the animation together. Each layer was placed in its position, then moved throughout the animation. Some things could be moved with the use of key frames, while some objects needed to be moved with puppet pin tools. I included a stick figure in my animation, and I used puppet pin tools to move it. My robot's legs were moved with the use of key frames. I set the legs in a position, then created a key frame to make the legs be in that position at the selected time. After a full cycle, I copied and pasted the key frames to make the walk look consistent.


The final animation wasn't the best. The concept was supposed to be that the robot was a ghost, or a hologram, or something. But nobody seemed to get that. They just figured I did a bad job. And while it wasn't as obvious as it could've been, I'm still learning this, I don't know how I could make it any clearer, and they probably should've been able to figure it out. Some of my classmates started pointing out stuff that was wrong with it, but I did those things on purpose to try and make it look like the robot was a ghost. Yes, there were things that I could have done better, but overall, most of the criticism was based around a false assumption. And at least something happened in my animations. There were some animations where the entire scene was a badly drawn blob walking for 30 seconds. If I had more time, I would have concentrated on the details a little bit more rather than just focusing on finishing.
Thursday, November 10, 2016
Feature Story Experience
The concept of my feature story was fellow classmate Austin Wilson's involvement in the school musical. He is the only sophomore in the pit orchestra for the musical. Filming the video was simple. I set up the camera, asked the questions, and recorded the answers. I also recorded him playing a few pieces from the music he has to practice. I put all of the clips together and imported some voice overs, and that was the video. Typing it was even more simple. I just listened to the video and typed all of the words that were said, along with some commentary.
Friday, October 28, 2016
Intro to MAYA-Castle
Recently in animation, my class has been learning to use MAYA a 3D modeling program. To help us hone our skills, we were instructed to build a castle. We used cylinders to build the towers, then selected certain sections of it and deleted them, creating something that actually looks like a castle watchtower. Next, we duplicated the tower until we had created four of them. We moved them to positions that we liked before moving on to the walls. I simply typed in X,Y, and Z coordinates to place each one at the exact corners of the plane.
To make the walls we built a rectangular prism, then sized it to fit our needs. After creating divisions in the wall, we cut out every other section to create the battlements. After the first wall was complete, we duplicated it and positioned all four walls between the four towers. Personally, I positioned mine on the border lines of the plane. This made it a lot easier, and I could simply type in X,Y, and Z coordinates instead of moving each wall to the perfect place by hand.
For the entrance, we formed a cylinder, combined it with a cube. Then in the Mesh Tab, we used the union tool to join the two items together. Then we inserted it into the wall. We then used the Difference tool in the Mesh tab. This erased the cylinder, cube, and the section of the wall that we put it in. This created a clean archway that serves as the entrance to the castle. Realistically, there would be a portcullis (the metal gate that is pulled up away from the entrance or dropped down to block invaders), but it wasn't a requirement and we hadn't learned a quick way to do that yet.
Color is an important part of animation, so naturally it was one of the first things we learned. To add color to a shape, simply add a lambert or blinn. Giving each object's blinn or lambert the same title will allow you to change every similar object's color at the same time, and it will be the exact same. Giving objects' lambert/blinn will allow for individual color change. I put down a flat plane inside my castle and colored it green. I named its blinn "The Ground". The walls and towers all had a lambert named "lambert1", so they all changed color together. Initially, shapes will appear as a light grey, but you can change them all you want.

My castle consisted of all the requirements. Four towers, four walls, a doorway, a flat plane, and color. Some of my classmates went a little further, adding extra towers, more walls, and much more detail. But I'm not the creative type. I do what needs to be done, and nothing more. You do have the option of adding extra detail, and many of the same techniques used here will help you do that. But I didn't have the time. So go ahead and explore MAYA, there's a lot you can do with it.
To make the walls we built a rectangular prism, then sized it to fit our needs. After creating divisions in the wall, we cut out every other section to create the battlements. After the first wall was complete, we duplicated it and positioned all four walls between the four towers. Personally, I positioned mine on the border lines of the plane. This made it a lot easier, and I could simply type in X,Y, and Z coordinates instead of moving each wall to the perfect place by hand.
For the entrance, we formed a cylinder, combined it with a cube. Then in the Mesh Tab, we used the union tool to join the two items together. Then we inserted it into the wall. We then used the Difference tool in the Mesh tab. This erased the cylinder, cube, and the section of the wall that we put it in. This created a clean archway that serves as the entrance to the castle. Realistically, there would be a portcullis (the metal gate that is pulled up away from the entrance or dropped down to block invaders), but it wasn't a requirement and we hadn't learned a quick way to do that yet.
Color is an important part of animation, so naturally it was one of the first things we learned. To add color to a shape, simply add a lambert or blinn. Giving each object's blinn or lambert the same title will allow you to change every similar object's color at the same time, and it will be the exact same. Giving objects' lambert/blinn will allow for individual color change. I put down a flat plane inside my castle and colored it green. I named its blinn "The Ground". The walls and towers all had a lambert named "lambert1", so they all changed color together. Initially, shapes will appear as a light grey, but you can change them all you want.

My castle consisted of all the requirements. Four towers, four walls, a doorway, a flat plane, and color. Some of my classmates went a little further, adding extra towers, more walls, and much more detail. But I'm not the creative type. I do what needs to be done, and nothing more. You do have the option of adding extra detail, and many of the same techniques used here will help you do that. But I didn't have the time. So go ahead and explore MAYA, there's a lot you can do with it.
Monday, October 3, 2016
How to Organize Clips in Adobe Premier Pro
Making a video doesn't just include filming, it requires the ability to edit the footage. Editing your video is a key part of making it good, and this tutorial will show you how to do it in Adobe Premier Pro.

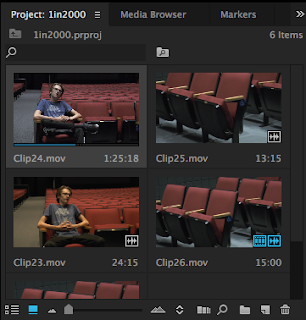
This is where the footage you imported will appear. From here, you can select individual shots before putting them into the final video. Double-clicking on the clips will open them in the preview window (top left in screenshot above). To organize clips before you put them in your video, you can put them into bins. Bins are like desktop folders, they allow you to put different clips in different places, so that you know where they are when you are ready to put them into your final video. Once you have edited clips in the preview tab, you go back to this area to click-and-drag the clips into the timeline.


This is what the whole screen looks like. In the top left, you see the preview window. Here, you can preview and edit clips before you put them into your finished video. The top right is where the current video timeline plays. The timeline is at the bottom right/middle. Once you preview a clip, you can drag it into the timeline to add it to your video. Once it's in the timeline, you can drag it around to edit where in the video it appears.
This is where the footage you imported will appear. From here, you can select individual shots before putting them into the final video. Double-clicking on the clips will open them in the preview window (top left in screenshot above). To organize clips before you put them in your video, you can put them into bins. Bins are like desktop folders, they allow you to put different clips in different places, so that you know where they are when you are ready to put them into your final video. Once you have edited clips in the preview tab, you go back to this area to click-and-drag the clips into the timeline.


Above is the timeline itself. Using the timeline, you can organize video and audio to create your final video. Also, you can use options along the top of your window to add effects to the timeline, like transitions between shots. Using the timeline is key, because you literally can't make a video without it. You can also use the scroll bars on the far right to change what you see in the timeline. In this screenshot, it's just a few bars. But if you adjust the scroll bars, you can see frames of the video, and the audio levels as the video plays.
If you still have any questions about how to use anything in Adobe Premier Pro, you should go find other tutorials, because I'm still learning how to use this too. Good luck!
Subscribe to:
Posts (Atom)