The concept of my feature story was fellow classmate Austin Wilson's involvement in the school musical. He is the only sophomore in the pit orchestra for the musical. Filming the video was simple. I set up the camera, asked the questions, and recorded the answers. I also recorded him playing a few pieces from the music he has to practice. I put all of the clips together and imported some voice overs, and that was the video. Typing it was even more simple. I just listened to the video and typed all of the words that were said, along with some commentary.
Thursday, November 10, 2016

Friday, October 28, 2016
Intro to MAYA-Castle
Recently in animation, my class has been learning to use MAYA a 3D modeling program. To help us hone our skills, we were instructed to build a castle. We used cylinders to build the towers, then selected certain sections of it and deleted them, creating something that actually looks like a castle watchtower. Next, we duplicated the tower until we had created four of them. We moved them to positions that we liked before moving on to the walls. I simply typed in X,Y, and Z coordinates to place each one at the exact corners of the plane.
To make the walls we built a rectangular prism, then sized it to fit our needs. After creating divisions in the wall, we cut out every other section to create the battlements. After the first wall was complete, we duplicated it and positioned all four walls between the four towers. Personally, I positioned mine on the border lines of the plane. This made it a lot easier, and I could simply type in X,Y, and Z coordinates instead of moving each wall to the perfect place by hand.
For the entrance, we formed a cylinder, combined it with a cube. Then in the Mesh Tab, we used the union tool to join the two items together. Then we inserted it into the wall. We then used the Difference tool in the Mesh tab. This erased the cylinder, cube, and the section of the wall that we put it in. This created a clean archway that serves as the entrance to the castle. Realistically, there would be a portcullis (the metal gate that is pulled up away from the entrance or dropped down to block invaders), but it wasn't a requirement and we hadn't learned a quick way to do that yet.
Color is an important part of animation, so naturally it was one of the first things we learned. To add color to a shape, simply add a lambert or blinn. Giving each object's blinn or lambert the same title will allow you to change every similar object's color at the same time, and it will be the exact same. Giving objects' lambert/blinn will allow for individual color change. I put down a flat plane inside my castle and colored it green. I named its blinn "The Ground". The walls and towers all had a lambert named "lambert1", so they all changed color together. Initially, shapes will appear as a light grey, but you can change them all you want.

My castle consisted of all the requirements. Four towers, four walls, a doorway, a flat plane, and color. Some of my classmates went a little further, adding extra towers, more walls, and much more detail. But I'm not the creative type. I do what needs to be done, and nothing more. You do have the option of adding extra detail, and many of the same techniques used here will help you do that. But I didn't have the time. So go ahead and explore MAYA, there's a lot you can do with it.
To make the walls we built a rectangular prism, then sized it to fit our needs. After creating divisions in the wall, we cut out every other section to create the battlements. After the first wall was complete, we duplicated it and positioned all four walls between the four towers. Personally, I positioned mine on the border lines of the plane. This made it a lot easier, and I could simply type in X,Y, and Z coordinates instead of moving each wall to the perfect place by hand.
For the entrance, we formed a cylinder, combined it with a cube. Then in the Mesh Tab, we used the union tool to join the two items together. Then we inserted it into the wall. We then used the Difference tool in the Mesh tab. This erased the cylinder, cube, and the section of the wall that we put it in. This created a clean archway that serves as the entrance to the castle. Realistically, there would be a portcullis (the metal gate that is pulled up away from the entrance or dropped down to block invaders), but it wasn't a requirement and we hadn't learned a quick way to do that yet.
Color is an important part of animation, so naturally it was one of the first things we learned. To add color to a shape, simply add a lambert or blinn. Giving each object's blinn or lambert the same title will allow you to change every similar object's color at the same time, and it will be the exact same. Giving objects' lambert/blinn will allow for individual color change. I put down a flat plane inside my castle and colored it green. I named its blinn "The Ground". The walls and towers all had a lambert named "lambert1", so they all changed color together. Initially, shapes will appear as a light grey, but you can change them all you want.

My castle consisted of all the requirements. Four towers, four walls, a doorway, a flat plane, and color. Some of my classmates went a little further, adding extra towers, more walls, and much more detail. But I'm not the creative type. I do what needs to be done, and nothing more. You do have the option of adding extra detail, and many of the same techniques used here will help you do that. But I didn't have the time. So go ahead and explore MAYA, there's a lot you can do with it.
Monday, October 3, 2016
How to Organize Clips in Adobe Premier Pro
Making a video doesn't just include filming, it requires the ability to edit the footage. Editing your video is a key part of making it good, and this tutorial will show you how to do it in Adobe Premier Pro.

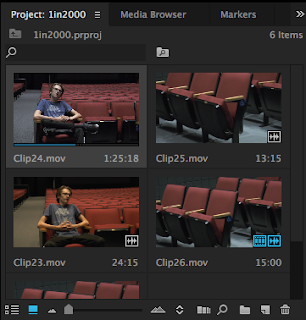
This is where the footage you imported will appear. From here, you can select individual shots before putting them into the final video. Double-clicking on the clips will open them in the preview window (top left in screenshot above). To organize clips before you put them in your video, you can put them into bins. Bins are like desktop folders, they allow you to put different clips in different places, so that you know where they are when you are ready to put them into your final video. Once you have edited clips in the preview tab, you go back to this area to click-and-drag the clips into the timeline.


This is what the whole screen looks like. In the top left, you see the preview window. Here, you can preview and edit clips before you put them into your finished video. The top right is where the current video timeline plays. The timeline is at the bottom right/middle. Once you preview a clip, you can drag it into the timeline to add it to your video. Once it's in the timeline, you can drag it around to edit where in the video it appears.
This is where the footage you imported will appear. From here, you can select individual shots before putting them into the final video. Double-clicking on the clips will open them in the preview window (top left in screenshot above). To organize clips before you put them in your video, you can put them into bins. Bins are like desktop folders, they allow you to put different clips in different places, so that you know where they are when you are ready to put them into your final video. Once you have edited clips in the preview tab, you go back to this area to click-and-drag the clips into the timeline.


Above is the timeline itself. Using the timeline, you can organize video and audio to create your final video. Also, you can use options along the top of your window to add effects to the timeline, like transitions between shots. Using the timeline is key, because you literally can't make a video without it. You can also use the scroll bars on the far right to change what you see in the timeline. In this screenshot, it's just a few bars. But if you adjust the scroll bars, you can see frames of the video, and the audio levels as the video plays.
If you still have any questions about how to use anything in Adobe Premier Pro, you should go find other tutorials, because I'm still learning how to use this too. Good luck!
Tuesday, September 20, 2016
1 in 2000-Keenan Capps
Every single one of the 2000+ students at Olathe Northwest has a story. In my Exploring A/V class, all of the students interviewed each other. We found out what our classmates' stories were, and specifically, what they did over the summer. For my interview, I talked to Keenan Capps about what he did over the summer. As it turns out, he had gone to Chicago with his parents just before coming back to school. In the video, he talks about his experiences and why he loved the trip. This is just one example of a normal student with an extraordinary story. Every student at ONW has a story like this, it's just a matter of finding it.
This video project required a 15-second voice-over. When writing the script for the voice-over, I tried to think of something to say that wouldn't sound corny or robot-like. I tried to say something that would relate to people. I hope I succeeded.
Making this video wasn't hard. Keenan and I got permission to go into the empty auditorium, and we set up the camera there. I sat on the stage and set the camera next to me, and Keenan sat in the first row of chairs. There were some times where we got off topic, so I did have to edit the footage, but I didn't change anything major. I made the video itself, then imported my voice-over into the beginning.
This video project required a 15-second voice-over. When writing the script for the voice-over, I tried to think of something to say that wouldn't sound corny or robot-like. I tried to say something that would relate to people. I hope I succeeded.
Making this video wasn't hard. Keenan and I got permission to go into the empty auditorium, and we set up the camera there. I sat on the stage and set the camera next to me, and Keenan sat in the first row of chairs. There were some times where we got off topic, so I did have to edit the footage, but I didn't change anything major. I made the video itself, then imported my voice-over into the beginning.
Thursday, September 8, 2016
Personal Project Review
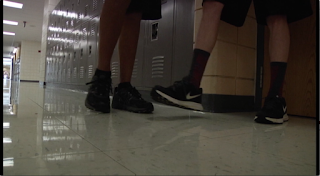
This is the first blog of my Sophomore year in e-Comm, and I have to review my own project. My video was about walking in the hallways. The main character gets tripped, someone helps him. It's pretty simple, the message is to just be nice. I tried to make the shots flow together, and the music sets the mood nicely. Some of my classmates told me that I needed different lighting, but it was a high school hallway during class. There was nothing I could do about it. Also, people told me that the video was shaky, as if I had neglected to use a tripod. Well, I didn't use a tripod. My classmates checked all of them out before I could get one. Again, nothing I could do about it. Overall, I think I did a nice job, considering the restrictions of a high school class.

https://youtu.be/jk1DnGbauK4


https://youtu.be/jk1DnGbauK4
Monday, May 16, 2016
Freshman e-Comm Final Reflection
This year in e-Comm I learned plenty of technical skills. I learned how to edit video footage in Final Cut Pro, use Adobe Illustrator and Photoshop, animate in Photoshop and SketchUp, and create a website using Adobe Dreamweaver. Over the course of the year, I created: 3 videos, 5 graphic design projects, 7 animations, and 3 websites. These were made before the final project. I learned that I like video production and animation better than graphic design and web design. In video production, we learned the fundamentals of filming and basic editing skills. In graphic design, we learned how to use Adobe Illustrator and Photoshop. Using our new knowledge of the programs, we created a variety of projects including: a creative color wheel, photoshop images of our school, and personal logos. In animation, we learned how to make animations in Adobe Photoshop. Using different shapes and layers, we created multiple short animations. We then used SketchUp to create 3D objects and we learned to create animations with that program as well. Throughout the year, we created several websites, and learned the basics of web design. Overall, my first year in e-Comm was great. I learned plenty of new skills, and I developed a love of being behind a camera. With 3 years left, I can only wonder what new skills I’ll attain in the years to come.
-Jackson Chien
Friday, May 13, 2016
My Contributions to Our Team

This is a coupon that I created for our team's final project. Our team ended up modifying it for the final product, but this was the starting design. I also created the outdoors landscape for our animation, which we ended up not even using. I filmed all of the footage in our videos, even though we only used one video for the final website.
Subscribe to:
Posts (Atom)